PowerINSPECT Curve Digitiser
Context
this document applies to :
- PowerINSPECT 1300
- PowerINSPECT 1350
- PowerINSPECT 1355
- PowerINSPECT 2001
- PowerINSPECT 2200
Summary
PowerINSPECT allows you to create digitised curves, by taking points on a part. These
points are linked together by a curve for which you can set a tolerance. The curve is
saved as a point cloud group which can then be exported as an IGES file and imported into
any other application that supports the IGES format.
Description
Digitised curve creation allows you to use PowerINSPECT to provide data for reverse
engineering. As you probe the points on the part, PowerINSPECT runs a best-fit curve
through them, as shown in the diagram below.
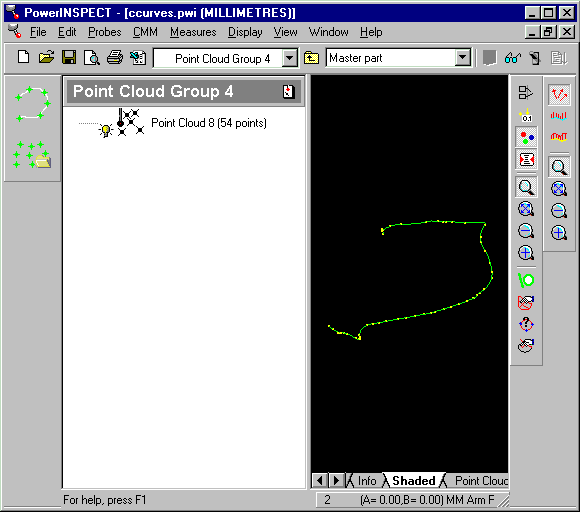
In the example, the yellow points are the points probed, and the green line is the
fitted curve. The Curve Fitting Tolerance used in the example was small, 0.001, so the
curve closely follows the actual form of the part probed. If you want to produce a smooth
curve, set the tolerance to a large value, for example, 10.
No CAD data is required when creating curves, although if you have the data it makes it
easier to visualise the part. If you want to sketch a planar curve on the part, you can
set a guided plane. This only allows PowerINSPECT to pick points that are on a specified
plane.
When you use a guided plane, you can pick the points in any order, as PowerINSPECT will
insert points into the curve in its logical position.
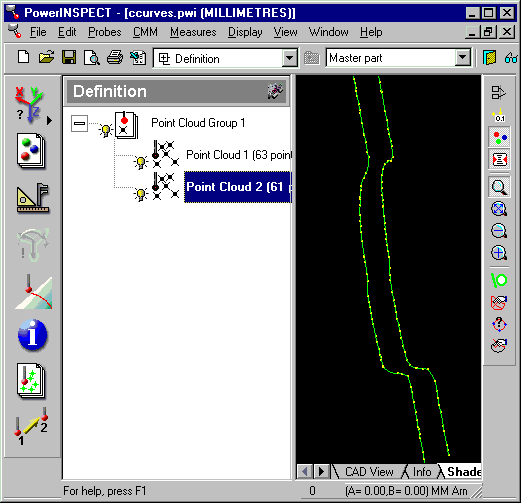
The guided plane options also allow you to set an automatic plane offset, so that you can
probe parallel sections through a part, one after the other, as seen in the example below.
Follow the steps below to create a digitised curve:
- Click on the Point Cloud button
 on the Element toolbar, to
create and open a new Point Cloud Group.
on the Element toolbar, to
create and open a new Point Cloud Group.
- Click on the Curve button
 on the Point Cloud toolbar
to display the CAD View full screen and the Sketch Curve Tool dialog box.
on the Point Cloud toolbar
to display the CAD View full screen and the Sketch Curve Tool dialog box.
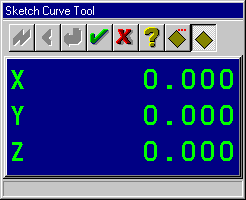
- Probe the points on the part that you want to include in the Point Cloud curve. You can
use the buttons in the Sketch Curve Tool dialog box as follows:
 |
Use this button to delete the records of all probed points |
 |
Use this button to delete the record of the last probed point |
 |
Use this button to accept the probed points, save them as a curve and keep
the dialog box open to probe a new curve |
 |
Use this button to accept the probed points, save them as a curve and
close the dialog box |
 |
Use this button to close the dialog box without saving the probed points |
 |
Use this button to display the on-line help page for this dialog box |
 |
Use this button to display the Curve Sketching Options
dialog box where you can specify how you want to sketch the curve |
 |
Use this button to use the settings specified in the Curve Sketching
Options dialog box’s Guided Plane area |
- When you click on to accept the probed points, PowerINSPECT returns you to the main
PowerINSPECT window where the curve you sketched is displayed in the CAD View tab.
You can export the curve to use another CAD/CAM package as an IGES file.
Tip: If you are using the guided plane feature with an articulated arm's rigid probe, keep
the trigger depressed continuously as you probe the plane. PowerINSPECT only records
points that are on the guided plane, within tolerance.
The 'Duplicated Point Tol' set in the 'Curve Sketching Options' dialog box prevents you
from recording overlapping points unintentionally.
Setting the Setting the Curve Sketching Options
Click on the Curve Sketching Options button to display the following dialog box:
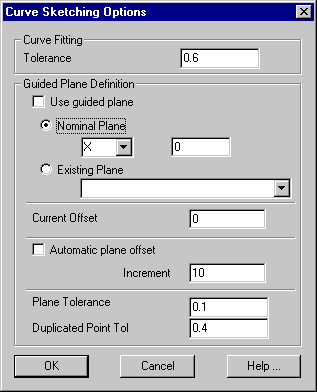
- Curve Fitting Tolerance – the value you enter here defines how the
accurately the curve will be fitted through the points you sketch.
A larger value is more appropriate when your surface has flaws that you want to mask.
- Enter a larger value here if you want PowerINSPECT to fit a smooth curve that will not
touch all the points but take an averaged path through them.
- Enter a smaller value here if you want to fit a curve that runs through all the points
to produce an accurate view of the part's surface.
- Guided Plane Definition - you use this area of the dialog box if you
want to constrain the curve to one plane. PowerINSPECT will only record points that are on
the defined plane, allowing you to measure a section through the part using an articulated
arm.
The boxes in this area are only available when you tick the Use guided plane tick
box. The guided plane used is the plane specified here plus the Current
Offset value.You use the options at the top of the area to define the guided
plane:
- Click on the Nominal Plane option if you want to define a new plane
Select the axis in the first list box, then type the value for the plane in the second
box. In our example, the nominal plane allows you to probe a section where X=730.
- Click on the Existing Plane option if you want to use a plane already
defined in the PowerINSPECT sequence. In our example, the existing plane allows you to
probe through a section defined by a plane set up as a Geometric Element.
- Current Offset – You can optionally enter an offset for the guided
plane here. If you want to offset the curve by the thickness of the part, enter the
thickness here.
- Automatic plane offset – tick this option if you want probe a
series of curves across the part. Each curve will be parallel to each other using the same
axis, the distance between them being defined by the Increment.
When you click on the button in the Curve Sketch Tool
dialog box, PowerINSPECT increments the Current Offset value with the Automatic
plane offset and uses it to constrain the new curve to the new plane.
- Plane Tolerance – this defines the maximum distance between the
probed point and the specified guided plane. Points must be within this distance to be
recorded as part of the curve.
- Duplicated Point Tol – this defines the minimum distance between
the probed points. If you probe a point that is within this distance to the last recorded
point, it will not be recorded as part of the curve.
This prevents PowerINSPECT recording multiple, overlapping points if you are using the
continuous record feature on an articulated arm.
When you have finished setting the options and are satisfied that they are correct,
click on the OK button